Binding a patchwork quilt with easy neat corners!

Step 1.
Choose your binding fabric and cut it into 2inch strips with enough length to go the full distance around the quilt. Remember you will need two lengths the same length as the sides of your quilt (the first two sides you sew on) and the second two strips to be long enough to sew the width of your quilt PLUS the width of the binding you've sown on either side.
Sew this 2 inch on two sides of your quilt. I use a seam allowance that is gauged by the width of my pressure foot. Not too wide. On my machine this is about 3/8 inch.
Press the two edges open.
Sew the binding strip to the other two sides of your quilt and also iron them open.
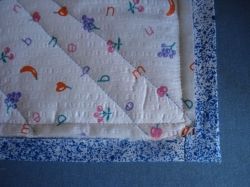
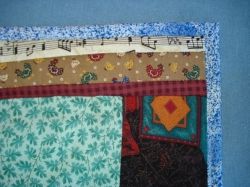
You will see in the photo that the 2inch binding strip is now sewn completely around the patchwork, ironed open and is ready to be folded into place.

Step 2
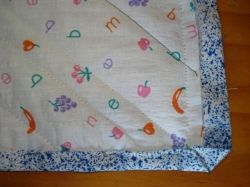
With the wrong side up, fold the corner of the binding into the edge of the quilt. Iron in place as per the picture here.

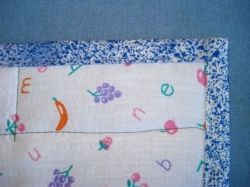
Using the ironing line that you have just made as a guide cut off the corner at an angle.
(This picture shown from the front)
Step 3.
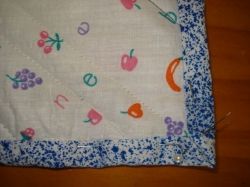
With wrong side facing up, iron the edge in half so that it butts up to the edge of the patchwork quilt. Notice how the corners form a neat mitre due to the corner being snipped off in the previous step. I have found that this doesn't have to be exactly precise although the neater it is the better everything will come together.

Step 4.
With the wrong side still facing up, iron the corner of the binding in. You will notice that the corner now touches the original stitching line and the fold lines should form a right angle shape. The pin is not necessary and was inserted for the purpose of keeping the fold in place for taking a photo. Ironing at every stage is very important to the accuracy of the binding.
Step 5.
Fold the edges of the binding in using the original sewing line as a guide. The binding should sit ever so slightly over the stitching line. At the corners, ensure everything is tucked very accurately and sharply. The folds should be crisp as if you were wrapping a present and wanted the end folds to be tidy. Pin the binding in place from the RIGHT side as this is the side you will sew from.
HINT!
When putting the pins in place, ensure they are facing the right direction to be removed when sewing on a machine.
We've all got this wrong at some time ;-)
The corner should look like this when both edges are folded in. Adjust as necessary. I find it helpful to pin the corner together with a single pin that runs from the outside corner in at the diagonal and catching both edges together. This pin is able to stay in place even when sewing on a machine.
Step 6.
Sewing from the front, sew close to the ditch or join of the quilt and the binding. This stitching line is on the binding, not the quilt. This will also catch in the back of the binding and finish the back too.
This is the back of the quilt after the sewing has been completed from the front. If desired, you can hand sew the corners together for a neater look and to make the quilt more durable.
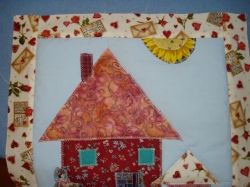
These photos were of a school holiday project with my kids! A fun scrappy quilt!
When making other quilts I find neat stuff at
my favourite online fabric store. Check it out!
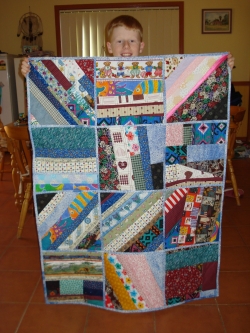
The Finished Scrappy Quilt!
This is my 10yo son with the finished quilt which was our school holiday project. He did 7 of the blocks with minimal guidance. My 8yo twins made 2 blocks each with my help and I did one and the joining and binding. We used a quilt as you go method which worked really well for the kids and is super quick and easy for me to finish the quilt too. We're having so much fun we're now making placemats! Lots of binding practice there!!
You may find my other lenses, website and articles on this subject interesting too.
- Quilt Batting or Wadding sizes and information.
This lens has quilt batting information and includes standard quilt sizes. - Help Me Patchwork
My website. It's a work in progress and I hope you'll enjoy seeing where I'm up to with it all. - My Articles.
I write on Street Articles also. Many of my articles are the learnings, or life lessons, I have received through my love of patchwork.
Want to know more about Patchwork?
I love patchwork! The one thing I love most about patchwork is the fabrics; their colours, textures, variations and the joy of seeing several pieces come together to make something new, interesting and unique.
If you would like to know more about patchwork you may enjoy visiting the following wikipedia link.
- Patchwork on Wikipedia
Patchwork - description, history and other good stuff!
Great Stuff on Amazon
I love patchwork books and magazines. They provide endless inspiration and motivation! I have the book listed here (501 quilt blocks) and would recommend it for easy to follow instructions on both pieced and appliqué blocks.


I'd love to hear what you think!


